Thanks for reading!
The ImagePrint Today blog is no longer active. Please visit us at https://www.colorbytesoftware.com for the latest product information, trouble-shooting guides and documentation for IMAGEPRINT BLACK and IMAGEPRINT R.E.D. and our newest automation option, Cut-It-Out!
ImagePrint v10 – A first look
It has been almost three years since we rolled out ImagePrint 9, a major upgrade that included many new features including the Profile Valet, our industry leading technology for delivering paper profiles on the fly. That version also laid the ground work for an improved look and feel to the interface that ImagePrint 10 builds upon, along with its own set of exciting features. In upcoming posts, we’ll take a more in depth look at some of these changes, but for now, let’s take a quick peek at some of what you can expect with ImagePrint v10.
Refined Look and Feel with Docking Menu Panes
Every window, including the layout window, can now be dragged as a separate element, allowing you to customize your workspace and utilize multiple monitors in ways never possible before.

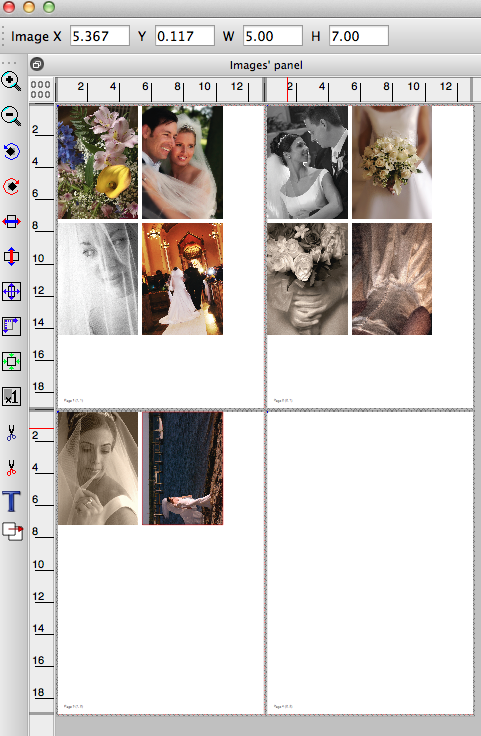
Multi-page layout
No more viewing only one page at a time. Create and scroll between an unlimited number of pages with our new scrollable Page Layout. You can also move images freely between pages in a live visual workflow.
Spread (aka Book) Mode
As part of the muli-page interface, images will split between pages as you drag them. Great for splitting pictures across book pages for albums and portfolio work. And, a new “Spread” mode displays your layout as two-page spreads for those making books, with complete control over the binding gab space between facing pages.

Smart Image Alignment
Drag an image within the layout area and “smart alignment” snap-to guides appear allowing you to line it up (edge or center) with other images or to other elements of the page such as the printable area boundary or the page center.

Draggable Guides
Creating your own “snap to” alignment guides is as easy as dragging from the edge of the layout window.

Image to Image Alignment
You can also align images to other images. Just select the first image, then control-click the ones you want to align to it, and choose the alignment option you want to use.

16-Bit Output Sharpening
ImagePrint 10 includes 16 bit Output Sharpening, one of our most requested features. And we did it right–because the output part of output sharpening is important.
Our new sharpening is inserted into our data pipeline as the last step before going to the printer, after building the print screens and resolution/size adjustments have been made. That means you can continue to size and resize the image within ImagePrint and the sharpening you specified will always be perfect for your final image dimensions. And of course, as with all ImagePrint corrections–it’s non-destructive. Your original image will remain the same.

Template Creation Redesigned
Creating your own photo packages is easier than ever with our redesigned Template Creation window. (There are also some new features coming soon so stayed tuned.)

Combined Corrections Window
See exactly how corrections affect your image before applying them, or see how the image appeared before the printer profile was applied with our new before and after views. Making last minute tweaks to an image has never been easier.

Automatic Updating From Within ImagePrint
No more checking a web site for updates and running a separate utility. Under the Help menu just choose Check For New Releases and update to the latest revision right from within ImagePrint!

Thanks for taking the time to take this sneak peek of version 10. More features may be added before the official release, and we hope to be able to announce support for new printers at the time of release as well.
The new ImagePrint 10. We hope you enjoy the experience!
When can you get it? There’s still no firm release date, but ImagePrint 10 is expected to be available in the last week of September, 2014. However, the software is currently available for purchase now as a stable pre-release for those who just can’t wait on both Windows and Macintosh. Call the ColorByte Sales Dept. for more information at 813 963-0241 (ext. 1).
Stephen Johnson Winter Workshop Schedule
2013
Black and White Printing Hands-on
November 16-18, 2013
http://www.sjphoto.com/digital-black-white-printing.html
The Beauty of the Real: The Land & Light of Pt. Reyes
December 6-8, 2013
http://www.ptreyes.org/fieldinstitute/classlistphotography.shtml#realisticphotography
2014
Death Valley in Winter
January 11-14, 2014
http://www.sjphoto.com/digital-photo-wksp-land-dv.html
Fine Art Digital Printing Hands-on
January 25-28, 2014
http://www.sjphoto.com/print_wkspHO_frameset.html
Flora and Form
February 6-8, 2014
http://www.sjphoto.com/digital-photo-wksp-flora.html
Yosemite in Winter
February 22-24, 2014
http://www.sjphoto.com/digital-photo-wksp-land-yoswin.html
Use ImagePrint as a Lightroom External Editor

Together at Last
Many of the same people who rely on ImagePrint to produce the best possible output for their images also rely on Adobe’s Lightroom to process and organize those same images. But… getting them from one program to the other can sometimes be a bit of a chore, requiring you to export the image from Lightroom, find the exported file on your computer, then re-open it in ImagePrint. Wouldn’t it be nice to avoid those extra steps and just go straight from Lightroom right to ImagePrint? Well, it turns out there is a way to do just that. By setting up ImagePrint as an External Editor in Lightroom.
We’ve talked in the past about one other alternative to having to save files before printing them–ImagePrint’s PTA (Print through Applications) option, which is an add-on to ImagePrint that allows you to send prints directly from any program on your Mac or PC to the ImagePrint spooler by just clicking Print.
But, when it comes to Lightroom, there’s another way to get files into ImagePrint that also avoids the dreaded File Save and File Open dialog boxes–one that doesn’t require any optional components and can be set up in less than a minute.
Lightroom’s External Editor feature is the key. By setting up ImagePrint as an external editor, you can simply choose to Edit in ImagePrint to have Lightroom place an image right in to ImagePrint’s layout window. Once there, you can utilize any of the normal ImagePrint workflow tools to position and size the image, then click Print to send it to the printer. Remember: the image that appears in ImagePrint will be a copy of the original Lightroom image–nothing you do in ImagePrint will affect that original.
Setting up ImagePrint as an external editor is easy. The following guide is for Lightroom 4.0 on Macintosh, but the same general rules apply to the Windows version as well as previous versions of Lightroom.
 1. In Lightroom, choose Preferences from the Lightroom menu at the top of the screen.
Then, choose the External Editing tab at the top of the Preferences window.
Look for the section of the window labeled: Additional External Editor.
Now, click the Choose button.
 In the Choose file dialog that appears, locate the ImagePrint executable.
On Mac, the file you’re looking for is “ImagePrint.app” You’ll find it in the ImagePrint folder inside your Mac’s Application folder.
On PC, look for the file “ImagePrint.exe”. You’ll find it in the ImagePrint folder which is located in your Program Files folder.
Once you find the ImagePrint executable, click Choose to lock in your choice.
2. Now you can set some rules for Lightroom to follow when it sends images to ImagePrint.
- In the File Format drop-down, choose TIFF.
- In the Color Space drop-down, choose your preferred source space (usually Adobe 1998 or Pro Photo RGB).
- In the Bit-Depth drop-down, choose 16 bit.
- For Resolution, if you don’t plan to scale the image in ImagePrint, 240 or above is fine. If you plan to use ImagePrint’s scaling, you may want to go higher to avoid losing detail.
- Finally, for Compression, leave it at None.
 3. Now that we’ve set up ImagePrint as our editor and set the rules that Lightroom will use, we need to save our settings as a Preset.
Click the Preset drop-down menu at the
top of the Additional External Editor area and choose Save Current Preset.
 Type in a name in the window that appears.
(ImagePrint might be a good choice).
Click Create, and you’ll have a new preset with the name you chose!
Now, when in Lightroom, you can right-click (or control-click) the image and choose Edit in ImagePrint (or whatever preset name you used) to quickly open the image in ImagePrint. You can also find that option under the Photo menu at the top of the Develop screen.
ImagePrint will launch (if it’s not already running), and the Lightroom image will appear in the layout window.
That’s it. From Lightroom to ImagePrint, with one click.
You may never have to use a File Dialog box again!
Summertime Workshops with Craig Stevens
Summer is a great time of year to attend a workshop. Many teaching professionals only have time in the summer to put on workshops. One such person is Craig Stevens. Craig is a b/w and color master and I highly recommend taking one of his workshops. Here are some dates this summer, take a look and give it a shot.
July 30th to Aug. 4th.
http://www.nordphotography.com/workshops/creative-fine-art-printing
July 14th to July 20th.
http://www.mainemedia.edu/workshops/photography/experimental-digital-printmaking
Aug. 18th to Aug. 24th.
http://www.mainemedia.edu/workshops/photography/personal-vision-expressive-print
Join Stephen Johnson on one of these exciting workshops

Highway One San Mateo Coast
<http://www.sjphoto.com/digital-photo-wksp-land-smcoast.html>
April 20-21, 2013
Pt. Reyes National Seashore
<http://www.sjphoto.com/digital-photowksp-land-ptreyes.html>
May 4-6, 2013
San Francisco Digitally
<http://www.sjphoto.com/digital-photo-wksp-sanfran.html>
June 1-2, 2013
RAW to Print Summer Digital Bootcamp
<http://www.sjphoto.com/raw-to-print-workshop.html>
June 10-14, 2013
Ireland’s Spectacular West Coast
<http://www.sjphoto.com/digital-photo-wksp-ireland.html>
July 21-31, 2013
Alaska Parklands
<http://www.sjphoto.com/digital-photo-wksp-lnd-alaska.html>
August 5-17, 2013
Stephen Johnson Photography
1220-C Linda Mar Boulevard, Creekside Suites 5-7
Pacifica, California 94044
studio: 650 355-7507
My Favorite Way to Print by Bryan Linden
Watch a quick video from Bryan Linden showing his favorite way to print.
Special Offer From FinestraArt

Join Stephen Johnson for his Fall and Winter Workshops
Stephen Johnson Photography Workshops 2012
Fine Art Digital Printing Hands-on
September 8-11, 2012
Raw From Raw: Still Life Studio Hands-on Photography Workshop with Stephen Johnson
September 23, 2012
Photographers & Photoshop Series
Photoshop CS6 and Photographers
Sept. 29 to Oct. 2, 2012
Mono Lake and the Eastern Sierra
October 13-16, 2012
Beauty in Photography: Inspiration and Composition
November 3, 2012
Fine Art Digital Printing Hands-on
November 10-13, 2012
Pt. Lobos and Carmel
December 1-3, 2012
Death Valley in Winter (full moon)
January 24-27, 2013
ImagePrint 9.0 and Mountain Lion
OSX 10.8 Ready!
As you probably know, Apple recently released OSX 10.8 Mountain Lion. We’re happy to announce that ImagePrint 9.0 is fully compatible with the new release! However there are a few things you should do to ensure ImagePrint and the new OS play nicely together.
Only ImagePrint 9 works with OSX 10.8. If you have a previous version, please contact our sales side for details on upgrading.
After Updating your OS, update your ImagePrint 9.0 too!
As with any operating system update, if you update the OS on a computer already running ImagePrint 9.0 you will need to download and run our Easy Updater to replace any system files the OS update overwrote. (Do this even if you are already on the most current ImagePrint 9 build.) You can get the ImagePrint 9.0 Easy Updater from ColorByte’s Technical Support page. Just download the Easy Updater for Macintosh, then double-click it to run it. No need to reinstall your printers or re-license the software.
Important: Only run the 9.0 updater if you have a valid ImagePrint 9.0 license! For details on updating from a previous version of ImagePrint, contact our sales dept.
Let ImagePrint through the Gate!
If you find that ImagePrint (or any ImagePrint related application) is blocked from opening after installing Mountain Lion, it’s Apple’s new GateKeeper trying to keep you safe from unknown programs. Please read the below information to allow the software to run and not be blocked in the future.
Mountain Lion has a new feature called GateKeeper that prevents unauthorized programs from launching. You may see a warning when launching ImagePrint for the first time after installing OS 10.8 telling you that the software is unauthorized to run. To allow software to launch in such a case, right click the application (or control click it) and choose Open in the menu that appears. You’ll then get a dialog with an Open button. Click the Open button and ImagePrint will launch. That’s it! ImagePrint will no longer be blocked from running in the future.
The same procedure applies to any other program or utility you wish to run, such as our Easy Updater, our Installer or our Profile Manager. — Just Right click it when opening for the first time after installing Mountain Lion, choose Open, then click the Open button in the dialog that appears.
If you find you can’t launch Spoolface by clicking the Spoolface icon at the top of the ImagePrint dashboard, you’ll need to manually open it once to tell GateKeeper to allow it.
In the Macintosh Finder navigate to the Spool folder within the ImagePrint folder (in Applications) and right click the Spoolface application. Choose Open in the menu, then click Open in the dialog box that appears.
